
Have you ever ever questioned why typically your images
look pixelated? It’s like there are grains within the photographs and the colours are
one way or the other boring. The images look a bit fuzzy. This usually makes you marvel, “Why are my images grainy?”.

You realize that you simply took the best shot, selected the
finest angle, and even did your finest to compose the scene. Nonetheless, the images come
out missing in vibrancy and shade. And so they look soiled. That is what grainy
images are like.
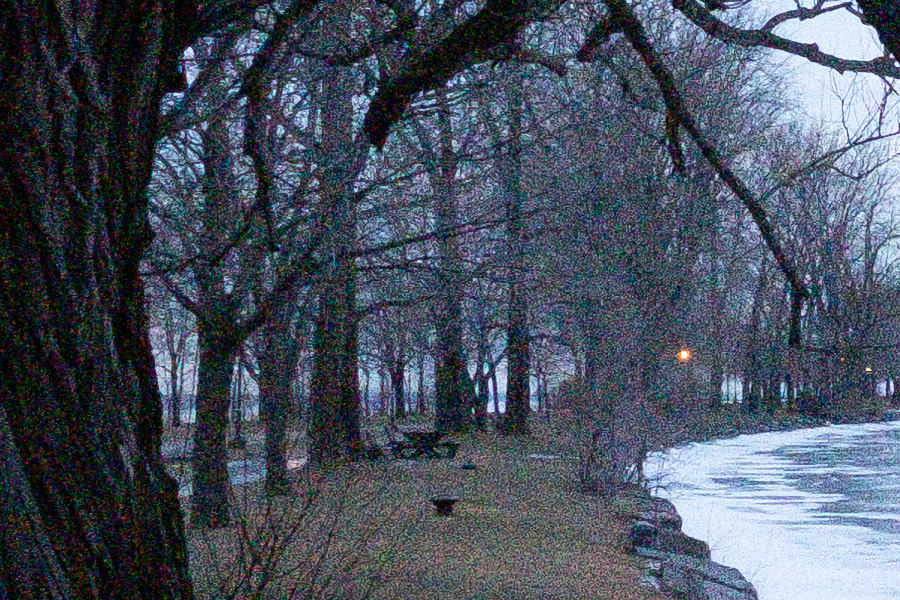
Grain is described as a visible distortion of types due to the tiny specks or flecks, or pixels, you see in your images. These “uncooperative” pixels may be of various quantities or texture and don’t symbolize the right publicity and shade of the picture. In different phrases, the picture is distorted and a few of its particulars are obscured.
One of the best ways to think about grain can be to visualise
small circles that seem in an image.
Grain vs. Noise
Grain and noise are sometimes used interchangeably or
in comparable context. The time period grain is extra generally utilized in movie images.
In digital images, photographers confer with it as noise.
Digital noise is much like sound distortion or disruption. If you end up recording one thing – similar to a tune – you hear some sort of a hiss once you take heed to it afterwards. That is what you name noise. So, in images, when there’s digital noise, your images’ colours and brightness might be altered. The diploma of luminance can also be affected.
Associated: Selecting the Proper Coating for Your Pictures
Additionally it is vital to notice that noise seems in shadows. You’ll be able to solely see it when you improve the brightness of a photograph. These seem like shade blotches or bands. Grain, then again, seems in highlights.
Whereas movie grain in analog images is sort of
common and is usually accepted, digital noise shouldn’t be one thing photographers
wish to take care of.
Anatomy of a Digital Noise
Have you ever tried taking a photograph at evening or in low-light situation? For those who brighten up the picture, you may need seen some specks of discolored pixels. That is what digital noise is all about. The extra you brighten the picture, the “uglier” and noisier it’s going to develop into.
To correctly perceive digital noise, additionally it is vital to know ISO and its function in creating this visible disruption.
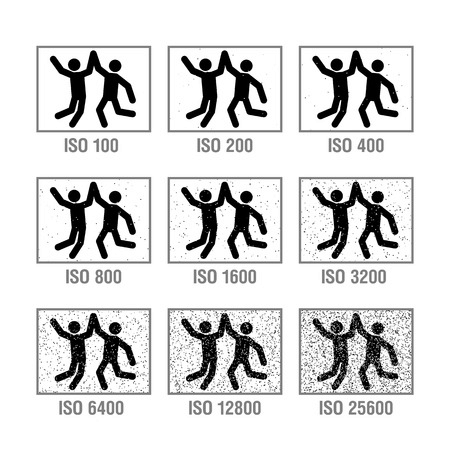
ISO is expressed in numbers that signify the movie’s sensitivity to gentle. The decrease the ISO quantity is, the lesser the sensitivity stage. Because the ISO will increase, gentle sensitivity additionally will increase. When it comes to noise, the upper the ISO stage, the extra noise there might be in your images.
Associated: Why are my photos blurry?
In digital images, nevertheless, ISO doesn’t essentially convert to sensor sensitivity. Reasonably, it’s extra related with acquire – or utilized acquire.
Let me clarify.
For instance, when you take a photograph with ISO set to worth of 200, the picture continues to be recorded at a base ISO of 100. When the picture is recorded, the acquire is utilized to spice up the brightness by an element of two.
That is when the picture will get affected and its particulars and sharpness are distorted and digital noise additionally will increase.
Why Are My Pictures Grainy?
As beforehand talked about, once you set your ISO to excessive ranges, your images will come out grainy. So, the upper the ISO, the grainier or noisier your picture will develop into. This usually occurs when your ISO is ready to 1600 or increased.
Always remind your self that the decrease the ISO
quantity, the much less grain your photographs can have.
Tips on how to Keep away from Grainy Pictures
In case your images are noisy or grainy, all shouldn’t be
misplaced. The very first thing it’s essential to do is attempt to discover out what led to that
consequence. It will then assist you to decide what it is best to do subsequent.
There are three issues you are able to do to stop your
images from turning into grainy.
1. Go for Decrease ISO
The obvious factor you are able to do is decrease your ISO once you shoot.
However there’s one other solution to work in your ISO. You would want to focus in your aperture and shutter velocity. Earlier than adjusting your ISO setting, open up aperture first. The decrease the f-number, the higher. On most high quality prime lenses, the bottom aperture is f1.2 to f1.8.
For extra data on the subject of publicity, please learn the article: Publicity Triangle: making sense of aperture, shutter velocity & ISO
If you need extra gentle to get in, regulate your shutter velocity by slowing it down. For those who don’t have a tripod and your digicam/lens doesn’t have the IS (picture stabilization) characteristic, don’t go under 1/50th of a second.
By opening the aperture and slowing the shutter velocity will permit you to use decrease ISO values and because the outcome cut back noise in your images.
2. Overexpose Your Photograph A Little Bit
This is perhaps tough to grasp however it actually works.
Don’t take a look at your digicam’s display screen. Use your histogram, as a substitute. The extent ought to spike just a little bit to the best. It could be higher when you use guide mode. Since noise seems in shadows or in darkish areas, it’s going to lower if the picture is barely overexposed.
Underexposing the picture, then again, will improve noise.
3. Use a Digital camera with Higher Low Mild Efficiency
Use a digicam with higher low gentle efficiency. These gear are supposed to particularly seize as a lot gentle as doable in low gentle conditions. They’re outfitted with options like top quality light-capturing sensors and picture processors preferrred for low gentle images.
Tips on how to Repair Grainy Pictures
In case you’ve already taken images that got here out grainy, there’s nonetheless hope. You’ll be able to nonetheless have your grainy images fastened.
Associated: Depth of Discipline (DOF) in Images
Eradicating Digital Noise in Lightroom
Whereas there are some cameras that include a noise discount characteristic, most photographers desire to make use of post-processing software program like Lightroom. Its Noise Discount part of the Element Panel will permit you to cut back luminance noise and shade noise individually.


Bear in mind, although, that utilizing a noise removing device can result in lack of some particulars in your picture.
Associated articles: Night time Images Settings
Eradicating Digital Noise in Topaz DeNoise
In circumstances when the digital noise in your images is excessive you will have one thing extra highly effective than Lightroom. That is once you want a Noise Discount Program like Topaz Labs’ DeNoise. It is a devoted noise discount program that can be utilized for extreme noise or grain issues. It’s an all-in-one noise discount program so that you don’t have to make use of separate functions to scale back noise after which repair the sharpness of the affected areas.
Conclusion
Some photographers might imagine that grain in your images is all proper. Typically, nevertheless, digital noise is taken into account a giant turn-off, and even your viewers know this – they only don’t know the proper time period for it. Whereas it might sound like a extremely technical drawback, there are easy options that may assist you to repair it.